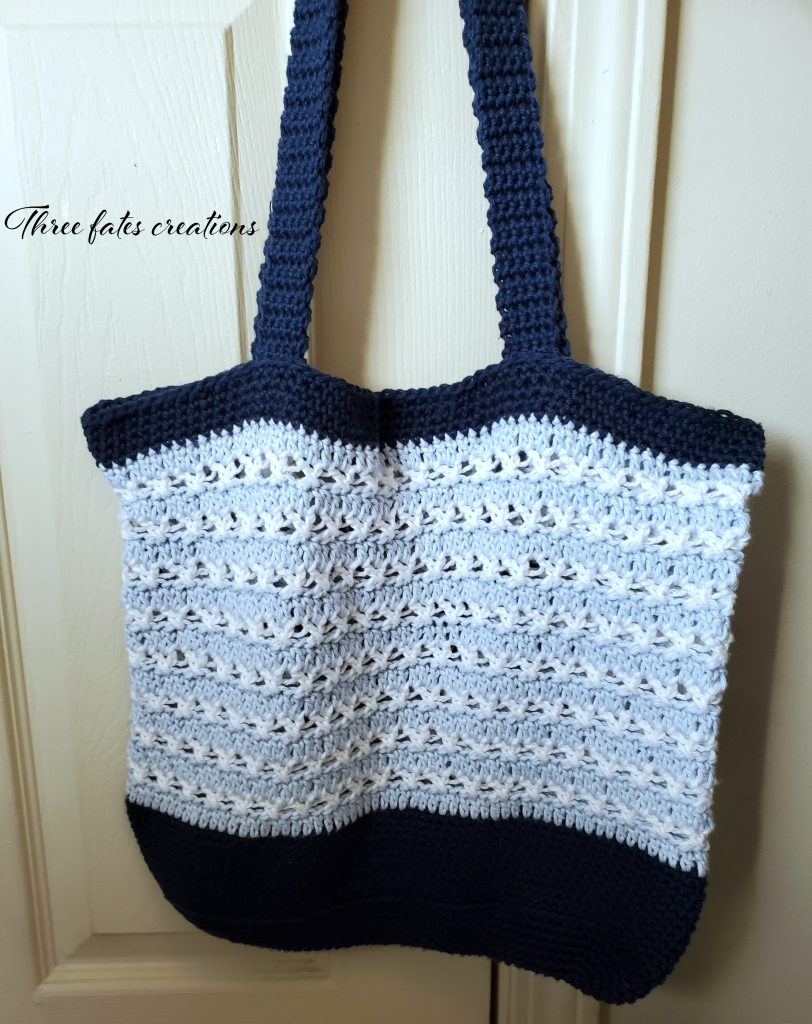
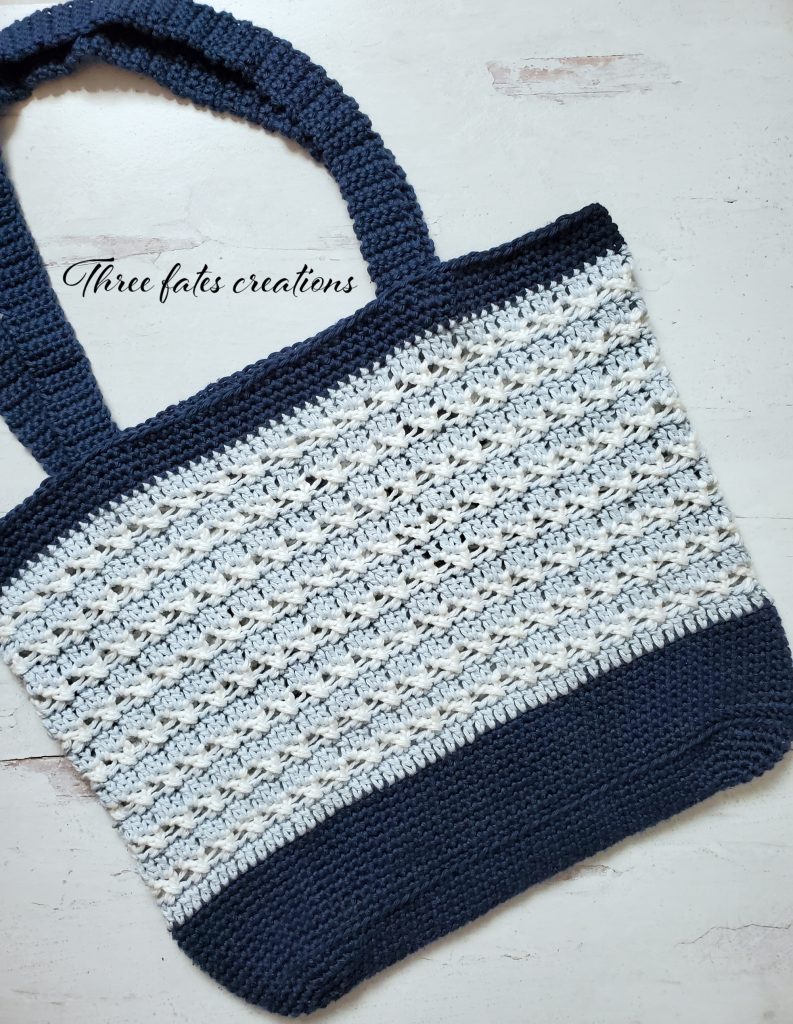
Aurora Crochet Tote Bag Free Pattern
This was the first time I used Knit Picks Comfy yarn in a project and I will definitely use it again. It is a cotton blend so it is soft but easier to work with than plain cotton. It has great stitch definition and there are a good amount of colors to choose from. I knew I wanted to make a summer bag with this colors and after finishing it all I can think is how this stitch pattern and yarn would make a cute summer top. I guess I will add that to my list.
The Aurora Tote can be worked up in a weekend if you are an experienced crocheter, but the pattern should be easy enough for an adventurous beginner to make, as well.
Skill Level
Intermediate
Finished Measurements
14″ ×15 ½” when bag is layer flat(not including straps)
Gauge
Base pattern in SC:15 sc=4 inches 20 rows= 4inches
Body pattern:8 rows=4 inches 15 dc= 4 inches
Materials
Knit Picks Comfy Worsted in Planetarium(MC), 3 skeins
Knit Picks Comfy Worsted in Clarity (CC1), 2 skeins
Knit Picks Comfy Worsted in White (CC2), 1 skeins
H-5 mm hook
Tapestry needle
Abbreviations
Ch=chain
SlSt= slip stitch
Sc=single crochet
Dc=double crochet
Special Stitches
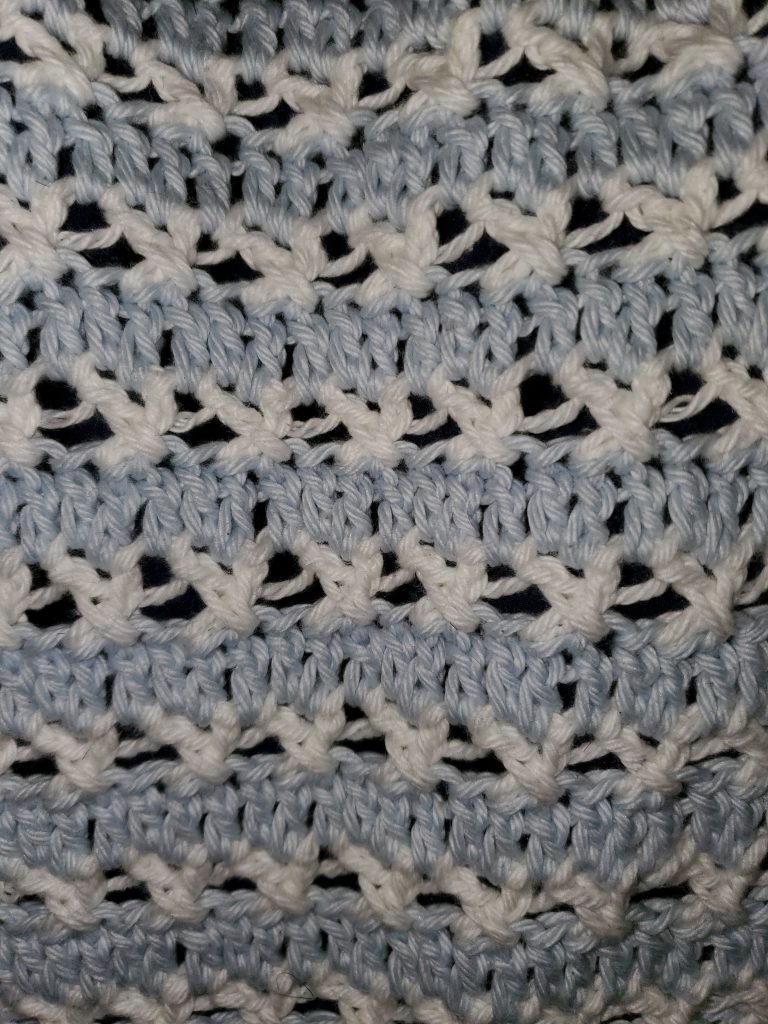
Cr-dc=crossed double crochet : skip 2 stitches, dc in next,ch 1, dc in first skipped stitch (ignoring the 2nd skipped stitch).
BL=back loop
Notes
This bag is worked in the round, starting from the bottom of the bag up. Chain counts as a stitch, except where specified. I recommend lining the straps and inside of bag, especially if you plan to use it regularly. It will help prevent the cotton from stretching out.
Instructions
BASE
Rnd 1:In MC, Ch 37. Sc in 2nd ch from hook and each ch across. Place 5 sc in last ch.(Put a stitch marker, or piece of thread, in each of these 5 stitches. These will be your increase stitches for base and you will move the markers up each round.) Working on the other side of the ch, sc in each stitch, placing 4 stitches in the last st.(which is also the same st as the first sc of the round. Place a stitch marker in the 4 stitches you just made and your first sc of the round. Slst in first stitch to join. (44 sc)
Rnd 2: Ch 1, 2sc in 1st st(move marker up from here on), sc in each stitch until you reach the first marked stitch. Make 2sc in each marked stitch. (Move markers up for each stitch from here on), sc in each stitch across until you reach the last 4 marked stitches. 2sc in each stitch(move markers up from here on). Slst in first sc.(54 sc)
Rnd 3-8: Ch 1, 2sc in first stitch, then continue placing an sc in each unmarked stitch and 2sc in each of the marked stitches, around. Slst to first sc. You should have 114 sc after finishing round 8. You can now remove the stitch markers.
Rnd 9: Ch1, Working in the BL, sc in each stitch around. Slst to first sc.
Rnd 10-20: Ch 1, sc in each stitch around. Slst to first sc.
BODY
Rnd 1:Using CC1, ch 3(ch counts as stitch), dc in each stitch around. Slst to first dc.
Rnd 2: Using CC2, ch 3 (ch does NOT count as 1st stitch),skip 1 stitch, dc in next stitch, ch 1,crossing over, dc in first stitch(the same stitch as the ch-3).Cr-dc over next 3 stitches. Continue working cr-dc over 3 stitches at a time all the way around. Slst to first dc.
Rnd 3-17: Continue in pattern working Rnd. 1 on all odd rows and Rnd. 2 on all evens rows.
Rnd 18-22: Using MC, ch 1, sc in each stitch around. Slst in first stitch.
STRAPS (make 2)
Row 1: Ch 6. Sc in 2nd ch from hook and each remaining ch across. Turn.
Row 2: Ch1, sc in each across. Turn. Repeat row 2 until strip measures 36 inches.
Fasten off. Finishing Sew in all ends.
Attaching straps
Attach first end of strap to the inside of bag, 4 inches away from edge. Attach 2nd end of strap to the inside, 4 inches away from other edge. Repeat this on other side for 2nd strap.
Fasten off. Weave in ends.
©2022 Three Fates Creations. This pattern is not to be duplicated or resold, and not to be reproduced commercially. You may sell finished products on Etsy, at farmers markets, and craft fairs, but please credit Three Fates Creations as the pattern’s author. Thank you.
Thank you for stopping by! I appreciate your support! If you would like to stay informed about by latest release, you may sign up for my newsletter here
Feel free to follow me on social media for more things crochet and yarn related: